
WaterWheeler Installation Instructions
Applies to WaterWheeler and AquaToy
Applies to WaterWheeler and AquaToy
- A) Hub and Crank Replacement
- B) Crank Bushing Replacement
- C) Pedal Replacement
- D) Rudder Rod Replacement
- E) Rudder Bracket Replacement
- F) Rubrail Replacement
- Hub and Crank Replacement:
-
1)
Having two people and being able to lean the boat against a wall will be helpful.
2)
From the underneath side, remove the nylock nuts and bolts from the hub tube. There may 2 or 4 bolts depending on the model and year of your boat.
3)
From the deck side, pull on the crank to slide it out of the hub tube. You may need to spray penetrating oil into the area where the crank slides into the hub tube.
Note: If the cranks are difficult to remove, use a pipe wrench to hold the hub tube and twist the crank back and forth while pulling it out of the hub tube.
If you cannot release the cranks from the hub due to corrosion your only option is to cut the cranks off. Cut cranks from the underneath side between the bushing and hub tube. Do not cut the bushing. You will have to replace both cranks and the hub.
4)
Pull cranks out of the crank bushing, lifting gently to get past the walls of footwell.
5)
Refer to procedure B for replacement of crank bushings.
Assembly
8)
Remove any deposits on the cranks with a scouring pad if they are not being replaced.
9)
Using a cotton swab, coat the end of the crank with a light coat of petroleum jelly to make assembly easier.
10)
Slide the crank through the bushing from the deck side. Install a spacer collar onto the crank.
Note: You may or may not need the spacer collars. If you use the spacers, be sure to use one on each side.
11)
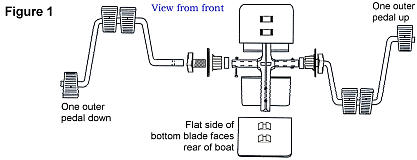
Place the hub such that the flat side of the bottom blade faces the rear of the boat. Slide the cranks into the hub tube.
11)
There are two sets of bolt holes on each end of the hub tube. Only one set of holes are used, depending on the model of your boat whether it will be the innermost or outer most set of holes. Slide crank into hub tube so that the bolt holes line up and insert bolt through the holes with the socket head resting in the larger hole. Make sure crank single pedals are facing opposite directions before inserting the bolt. See Figure 1
12)
Place nylock nuts on bolts and tighten.
13)
Refer to procedure D for hub blade installation.
Back to top
- Crank Bushing Replacement:
-
1)
Refer to procedure A and remove the cranks and hub.
2)
If your bushings have a stainless steel retainer on the underneath side, cut or pry the retainer off using tin snips, needle nose pliers or a flat head screw driver. Note: Be careful the stainless steel retainer is sharp.
3)
If your bushings are riveted in, use a 3/16" drill bit to drill out the heads of the rivets.
4)
Remove the backing plate from the bushing and remove the old bushing.
Assembly
6)
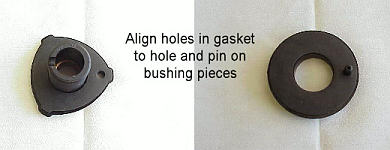
Remove the adhesive backing paper from the gaskets and apply to bushing pieces one at a time, take care to align the small hole on the gasket.
6)
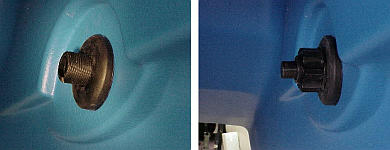
Insert the threaded part from the top side of the boat, orient the small alignment hole vertically upward. It may be necessary to drill a small hole in the boat using an "F" size drill bit using the alignment hole as a guide.
7)
From inside the paddle wheel well, place the backing plate over the threads, ensure the pin engages the alignment hole in the bushing.
8)
Thread the nut onto the bushing. Tighten the nut against the backing plate to a strong "hand-tight" torque. Ensure the backing plate is solidly in contact with the boat hull surface. Using channel locks, turn the nut 2-4 additional "clicks" of the locking feature. Do not over tighten.
9)
Refer to procedure A for installation of cranks and hub.
Back to top
- Pedal Replacement:
-
1)
Remove old pedal if present.
2)
Place 1/2 half of the pedal on each side of the crank.
3)
Line up the locking tabs.
4)
Press the 2 halves together until you hear a click sound.

Back to top
- Rudder Rod Replacement:
-
1)
Remove the rear cover plate. Use a 3/16" bit to drill out the four rivets securing the plate to the deck. Be careful not to let the rivets spin and enlarge holes in plastic.
2)
Disconnect the steering rod from the rear clevis by removing the cotter pin.
3)
Remove the front cover plate by drilling out the six rivets around the perimeter of the cover. Be careful not to enlarge the holes.
4)
Pull the front cover plate with steering rod out of boat. Disconnect the rod from the steering arm by removing the clevis pin and cotter ring.
5)
Attach the new rod assembly to the front cover plate with the cotter pin and ring. Slip the steering rod through the steering tube and position the front cover plate in place.
6)
Locate the holes from the original front cover plate and redrill through the new front cover plate. Use a pop rivet tool to fasten the front cover plate to the boat with six of the included rivets.
7)
Replace the rear clevis if necessary. Place the angle slot toward the tiller post arm to allow for full steering mobility.
8)
Insert the steering linkage rod into the rear clevis. Before drilling a new new hole for the cotter pin, test the length of the steering rod by positioning the steering arm on the rear cover plate to the straight ahead position. The rudder blade should also be in the straight ahead position. If the rudder blade is to the right of center, the rod is slightly too long; if the rudder blade is to the left of center, the rod is slightly short. Change the length of the rod by adjusting it to the correct length in the rear clevis pin hole.
9)
Once rod length is determined to be correct, drill the clevis hole using a 3/32" bit and fasten with cotter pin.
10)
Reinstall the rear cover with the four remaining rivets.
Back to top
- Rudder Bracket Replacement:
-
1)
Remove the rear cover plate. Use a 3/16" bit to drill out the four rivets securing the plate to the deck. Be careful not to let the rivets spin and enlarge holes in plastic.
2)
Disconnect the steering rod from the tiller post by removing the clevis pin and cotter ring.
3)
Drill out the rivet securing the lower bracket to the post. Pull bracket off of post and pull post and elbow out of bushing. See Figure 8.
4)
Carefully drill out the three rivets in the rudder bushing. Remove the old bushing and bottom plate.
5)
Remove the adhesive backing paper from the gaskets and apply to bushing and backing ring.
6)
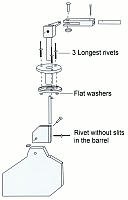
Insert the male part of the new bushing through the boat deck and place the backing plate on the underneath side. Make sure the gasket side is against the hull. Line up the holes in the bushing and plate with the holes in the boat. Insert the 3 longest rivets through the holes in the top bushing. Press the bushing and backing plate tightly together. Slide a washer over the rivet and tighten using a pop rivet tool. Repeat for the remainng rivets.
7)
Slide the post through the bushing with the elbow on top pointing to the left side of boat.
7)
Slide the rudder bracket onto the post with the slot for the rudder blade facing the rear of boat and attach using a rivet.
8)
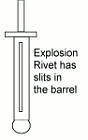
Reconnect the linkage rod and replace the rear cover plate with the 4 explosion rivets These rivets will have a slot in the barrel.
Back to top
- Rubrail Replacement
-
1)
Carefully drill out the old rivets and remove the rubrail. Clean off any old adhesive that might be on the boat.
2)
The new rubrail must be heated to allow it to stretch and fit your boat. Carefully heat the rail to about 160° - 190° F or until it stretches easily. This can be accomplished by placing it in an oven set to 250° for 8 - 12 minutes until soft. Leave the oven door partially open with about 6-8" of the rubrail ends hanging out the oven door. This will keep the ends cooler so that they do not tear when pulling the rubrail around the boat. Wear gloves when handling the heated rubrail. CAUTION: DO NOT PLACE THE RUBRAIL TOO CLOSE TO THE OVEN HEATING ELEMENT.
3)
Start at the center stern of the boat. Drill a 3/16" hole near where the previous rivets were if you can't use the original holes in the boat flange. Secure one end of the rail with two rivets using a washer on the underneath side of the rivets.
4)
Place the rail along the boat's contour while applying a constant tension to stretch it slightly. Drill and secure the remaining end with rivets. Trim to length as necessary.
5)
NOTE: Once you take the hot rail out of the oven, move quickly to complete installation before it cools. Using two people to install the rubrail is easier.